Show Buddy Active : presets not loading and/or Effects tab is not working
Solution : Open File > Preferences > Audio/MIDI Settings and make sure a valid Input audio device is selected:
Explanation : Show Buddy Active uses the audio input as an accurate timing source, to manage crossfades and oscillators, and to process incoming MIDI data. If no input is active, then you will experience various issues with switching between presets and running effects within presets.
Show Buddy Active can run as a VST or AudioUnit (AU) plugin directly within any compatible DAW. This lets you visually program synchronised light shows alongside your audio tracks.
This article shows the quickest way to program lights in Logic Pro using the Show Buddy Active AU plugin.
First, open your Logic song and choose [Track > New tracks…] from the main menu.
This takes you to the “Create New Track” window.
Highlight Software Instrument in the MIDI box
In the Instrument popup menu, select AU MIDI-controlled Effects > db audioware > Show Buddy Active > Mono
Set Multi-timbral = 2 parts
Click the Create button.
This will add two new tracks to your arrangement. We will use the first track to program our SBA bank changes, and the second track to program our SBA preset changes.
Rename the tracks to SBA Banks and SBA Presets.
Under the Track inspector panel, set MIDI Out channel for the tracks to 15 and 16. (MIDI channel 15 switches SBA banks, and track 16 switches SBA presets)
At this stage, the Show Buddy Active AU has been added to your project, and you are ready to start programming some lighting changes!
Simply add MIDI regions and notes as required, wherever you need an SBA bank or preset change. For example, here we have a MIDI region on the Bank track that triggers the first bank at bar 1 (using Note C-2), and the second bank at bar 2 (using note C#2).
You may find that when you load a fixture into Show Buddy Active, it displays too many icons, or not enough icons on the visualiser, or doesn’t display colours correctly. This indicates that the fixture needs some tweaking to work with SBA.
SBA examines each fixture to find the “heads”, and each head is displayed on the visualiser as a separate icon. For example, an RGB parcan has one head, an 8-channel dimmer pack has 8 heads, an LED strip with 6 RGBAW sections has 6 heads.
SBA creates heads according to these rules:
If there is at least one Dimmer channel, and no RGBAW channels, create a head for each Dimmer channel;
If there is at least one RGB/RGBA/RGBW/RGBAW block, create a head for each block;
Otherwise, create a single head.
In addition:
RGBAW and Dimmer channels must be defined as type “D” in the fixture file.
RGBAW must be named “red”, “Red”, “R”, “green”, “Green”, “G” etc in the fixture file.
These simple rules will cover most popular fixtures. However, the more fiddly fixtures present a problem – not just for SBA, but for every DMX visualiser out there. I’m thinking of those ‘adventurous’ fixtures that try to combine a laser, two moonflowers, a toaster oven and an electric toothbrush on one convenient t-bar.
For those more complex fixtures, it’s usually best to split it into several fixture files , one for each logical section of fixtures.
The “Modify Channels” window is available in Show Buddy Active 2.3.0 or later. It lets you make a variety of tweaks to the transmitted DMX data – crucially, without editing any of your presets. Some useful applications include:
Applying dimmer curves to the colour channels of LED fixtures.
Forcing channels to transmit fixed values (e.g. to disable unwanted effects channels).
Restricting the range of channels (e.g. to limit the maximum brightness of LED floods).
Modifying the pan/tilt ranges of movers at each venue – without editing presets!
Controls overview
This list shows every channel patched in your lighting rig. You can select channels for editing here, or by selecting channels as normal in the “Controls” tab of the main window.
Create multiple profiles and switch between them as required. For example, you could have profiles with different rig brightness levels, or profiles with moving head positions tweaked for different venues.
“Override” locks selected channels at the value set by the slider.
The display shows the current tweaks applied.
“Symmetric” and “Curve shape” modify the dimmer curve applied.
“Min and Max DMX val” limit the range of possible channels values.
“Scale” and “Shift” will offset or multiply the DMX values transmitted.
“Reset” will revert all channel settings to the default values.
Dimmer curves
Here, we apply a logarithmic dimming curve to the RGB channels of the “Wash3” fixture. This can improve the intensity and colour response of fixtures with simple LED drivers.
Overriding channel values
Here, we override some redundant channels on “Wash3” to a fixed value of zero. Often, fixtures have a range of custom channels for controlling built-in effects or other special features. If we are not interested in using these special features, we can override them and the corresponding DMX channels will remain locked at the specified value.
Additionally, when “Hide unused channels” in activated on the main window, any overriden channels are also hidden from the fader rack, leaving you to focus on the channels that matter.
Limiting channel ranges
Here, we limit the maximum dimmer level of all RGBA channels in fixtures CD1-CD4. This effectively halves the brightness of those 4 fixtures.
This is useful for fine tuning the brightness of sections of your rig at the venue, without needing to edit any presets. For example, if a spotlight is blinding the performer in one particular venue, simply reduce “max DMX val” for the spotlight dimmer channel.
Modifying mover position & range at a venue
Here, we scale the Pan & Tilt channels of “Wash4” down to 80%, effectively reducing the stage area covered by that mover – again, without editing any presets.
Use the Min/Max/Scale/Shift controls to manipulate the range of moving heads as required. For example, if you need to prevent movers scanning the crowd at the venue, tweak the min/max values for the Tilt channels until the movers stay on the stage.
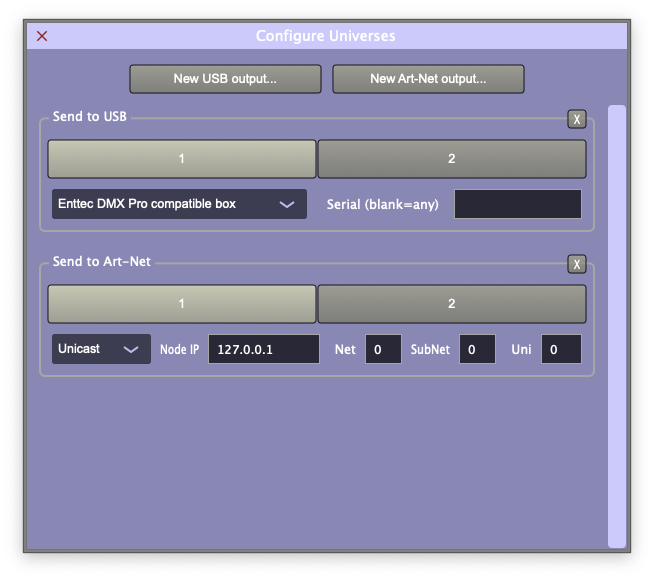
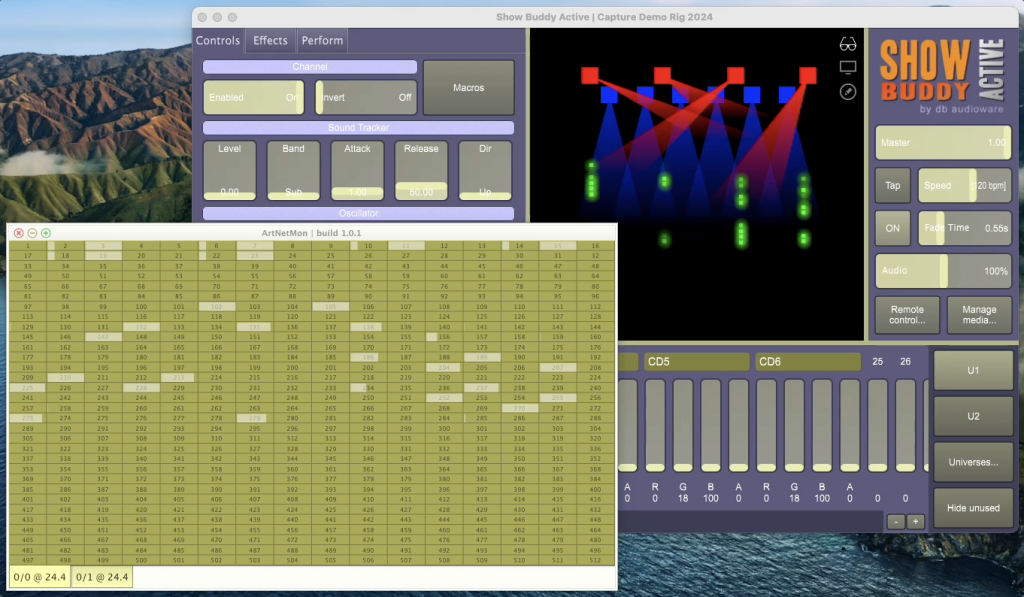
The free ArtNetMon utility displays DMX data transmitted by Show Buddy Active in realtime. This is really handy for checking that the values sent to your fixtures are correct – especially of you have a preset which is behaving strangely.
This also displays the data being sent to a USB interface box. It does not require you to use Art-Net to control your rig.
Just download and install the ArtNetMon utility onto the same computer you run Show Buddy Active from. Then click the “Universes…” button and add a new Art-Net output (Unicast to 127.0.0.1) as follows:
Now, run ArtNetMon, and it will display the DMX data being sent to your USB and/or Art-Net interfaces.
Show Buddy Active supports the Enttec Open DMX device (or any compatible 3rd party device).
Connect the Open DMX device to a free USB port
Click Universes…
Select Enttec Open DMX compatible box from the drop-down menu.
Then close the Configure Universes window, and Show Buddy Active will begin transmitting to the device.
Help! My Open DMX box is not working on my Mac
If Show Buddy Active appears to connect to your Open DMX box but does not transmit data, try installing the D2xxHelper utility from the official FTDI website.
If your Open DMX box still won’t respond, check that D2xxHelper is installed properly on your Mac as follows:
Open a Finder window
Select “Macintosh HD” from the left panel
Navigate to “Library > Extensions”
Make sure you can see “D2xxHelper.kext” in the Extensions folder…
Do I need Show Buddy Setlist or Show Buddy Active?
Show Buddy Active is a DMX lighting controller. You use it to program lighting “looks”, and switch between those looks manually at showtime (using a footswitch, MIDI controller, or computer mouse/keyboard). Show Buddy Active can also display images and video clips on a projector, all synchronised with your DMX lighting.
Show Buddy Setlist automates your shows. It plays your audio backing tracks, organises your songs into sets, displays lyrics, and controls your lighting, video & MIDI equipment for a fully synchronised hands-free show.
If you want simple manual control of your lighting rig, choose Show Buddy Active.
If you want to pre-program your full show (leaving you free to perform while the software takes care of your audio, lighting, video and MIDI equipment) then choose both Show Buddy Setlist + Show Buddy Active.
What happened to Show Buddy?
Show Buddy Setlist is the new name for Show Buddy. If you already own a Show Buddy license, you can upgrade to Show Buddy Setlist for free. Your existing programming will remain intact. Grab the latest software here.
I use Show Buddy + DMXIS. What happened to that?
DMXIS manufacturing ceased some time ago, and the DMXIS software is no longer being updated. You can still use DMXIS with Show Buddy Setlist, but we recommend that our Show Buddy Setlist users consider switching from DMXIS to Show Buddy Active for DMX lighting control.
Switching from DMXIS to Show Buddy Active is easy. You can import your old DMXIS banks & presets, and all of your Show Buddy Setlist programming will remain intact. You can also use a variety of DMX hardware interfaces, so you are no longer tied to the blue DMXIS hardware box.
Licensing questions
How can I get Show Buddy Setlist?
Show Buddy Setlist licenses can be purchased in our online shop.
Is Show Buddy Setlist a subscription service?
Absolutely not! Your initial purchase cost gives you a perpetual license to use Show Buddy Setlist, with no ongoing subscription costs or upgrade fees.
Can I run my license on more than one computer?
Your Show Buddy Setlist license is personal to you. You can install your license on multiple computers, if you are the main user, and only one computer will be in use at any time.
For example, say you run lighting for your band, and need to install your Show Buddy Setlist license onto a home computer for programming, a laptop for running live gigs, and a backup laptop for emergency use. This is fine, as you are the main user of all 3 computers.
However, you could not then install your license on a computer at your church for other people to use. This would require a second license for the church.
Do I need an internet connection to use Show Buddy Setlist? No. Once you unlock your license on your computer, Show Buddy Setlist is yours to run forever.
Show Buddy Setlist never “phones home” to check your license details. Your license will never time out, or be disabled by any other means. If you are at a gig with no Internet access, your software will always run fine.
Hardware questions
How can I control Show Buddy Setlist remotely? You can control Show Buddy Setlist at showtime using a simple wired USB footswitch. Any standard “page turner” footswitch which behaves like an external keyboard will work fine. Alternatively, you can use a wireless MIDI footswitch like the AirTurn BT500S.
The View > Remote Control menu option lets you assign keys (i.e. buttons on the footswitch) to each command.
Solutions to common issues
After installing the latest Show Buddy Setlist release on a Mac, the DMXIS window will not open.
DMXIS doesn’t natively support Macs with Apple Silicon. As a workaround, you can run run Show Buddy Setlist under Rosetta as follows:
Navigate the the Applications folder in Finder
Right click on the Show Buddy Setlist icon.
Select “Get Info” .
Enable “Open using Rosetta” and close the info window.
Restart Show Buddy Setlist. The DMXIS window should now open.
If you should switch to using Show Buddy Active instead of DMXIS in the future, remember to clear the “Open using Rosetta” flag to get all the performance benefits of your Apple Silicon machine.
Do I need Show Buddy Setlist or Show Buddy Active?
Show Buddy Active is a DMX lighting controller. You use it to program lighting “looks”, and switch between those looks manually at showtime (using a footswitch, MIDI controller, or computer mouse/keyboard). It comes with VST and AudioUnit plugin support, allowing you to automate your light show from a DAW. Show Buddy Active can also play back video clips to a projector (with the optional ‘Projection’ license)
Show Buddy Setlist automates your shows. Think of it like a easy-to-use DAW, which can play your audio backing tracks, organise your songs into sets, display lyrics, and control your lighting & MIDI equipment for a fully synchronised hands-free show.
If you just want manual control of your lighting rig, or you want to add an automated light show controlled by your DAW, choose Show Buddy Active.
If you don’t use a DAW, but want a simple way to to pre-program your full show (leaving you free to perform while the software takes care of your audio & lighting) then choose both Show Buddy Setlist + Show Buddy Active.
What happened to Show Buddy?
Show Buddy Setlist is the new name for Show Buddy. If you already own a Show Buddy license, you can upgrade to Show Buddy Setlist for free. Your existing programming will remain intact. Grab the latest software here.
What happened to DMXIS?
DMXIS hardware is no longer being manufactured, and the DMXIS software is out of support. We now recommend Show Buddy Active for DMX lighting control.
If you currently use DMXIS, you can switch to using Show Buddy Active and import your existing DMXIS banks & presets. Your blue DMXIS box will work with Show Buddy Active, but note the question below regarding discontinued support for the footswitch socket.
Please note that a Show Buddy Active license is a separate purchase, see next section.
Licensing questions
How can I get Show Buddy Active?
Show Buddy Active licenses can be purchased in our online shop.
Is Show Buddy Active a subscription service?
Absolutely not! Your initial purchase cost gives you a perpetual license to use Show Buddy Active, with no ongoing subscription costs or upgrade fees.
Can I run my license on more than one computer?
Your Show Buddy Active license is personal to you. You can install your license on multiple computers, if you are the main user, and only one computer will be in use at any time.
For example, say you run lighting for your band, and need to install your Show Buddy Active license onto a home computer for programming, a laptop for running live gigs, and a backup laptop for emergency use. This is fine, as you are the main user of all 3 computers.
However, you could not then install your license on a computer at your church for other people to use. This would require a second license for the church.
Do I need an internet connection to use Show Buddy Active?
No. Once you unlock your license on your computer, Show Buddy Active is yours to run forever.
Show Buddy Active never “phones home” to check your license details. Your license will never time out, or be disabled by any other means. If you are at a gig with no Internet access, your software will always run fine.
Hardware questions
What hardware do I need to use?
Show Buddy Active can control one universe of DMX lighting via any Enttec PRO / Open DMX compatible hardware interface.
To control multiple universes, an Art-Net box is required.
We recommend using Art-Net if you intend to run professional shows. As a network based protocol, Art-Net takes a little more effort to configure compared to a USB interface, but offers better reliability. Simple Art-Net interfaces like the Chauvet DMX-AN2 give multiple universes of DMX output at a reasonable price point.
Enttec USB PRO compatible boxes are reliable and convenient. However, you are limited to only one universe of DMX output.
Open DMX interfaces (the original Enttec box, or a compatible 3rd party interface) are mainly designed for hobby applications. They are an affordable way to experiment with lighting, but don’t have the reliability & feature set of the more expensive PRO boxes.
Will cheap interfaces from eBay work?
Perhaps
Lots of cheap unbranded 3rd party interfaces are available from online marketplaces. However, quality can vary, and it’s often difficult to tell if they are suitable as vendors rarely state what standards they implement. As always, buyer beware!
A top tip is to look for an interface that uses the FT232RL chip, or is supplied with FTDI software drivers. This generally indicates an Open DMX clone, which should work fine with Show Buddy Active.
3rd party interfaces that use non-FTDI chips (for example the PL2303) are NOT compatible with our software.
How do I send video to a projector?
With a Show Buddy Active Projection license, you can play video as well as control DMX lighting.
This is easy to set up – simply connect your projector to your computer as recommended by the manufacturer. As most projectors tend to use HDMI or VGA connectors, you will often need to use a suitable adaptor cable (e.g. to connect to the USB-C port on your laptop).
Once connected, setup Mac or Windows to use your projector as an extended desktop. Then, click on the ‘monitor’ icon (top-right in the Show Buddy Active visualiser) to open the video window, and drag that window onto the projector section of the desktop. Finally, click anywhere in the window to make it full-screen.
I use a footswitch connected to the DMXIS box. Where did the footswitch settings go in the software?
Hardware support in Show Buddy Active has changed significantly, since the DMXIS interface box is no longer available to purchase. The footswitch socket of the old DMXIS hardware is no longer supported.
Show Buddy Active now supports a wider range of generic DMX interfaces (see above), and footswitch control is now via the new “Remote Control” button. You can use any generic PC USB foot pedal or a MIDI footswitch to remotely control Show Buddy Active.
Help! My Open DMX box is not working on my Mac.
If Show Buddy Active appears to connect to your Open DMX box, but does not transmit data, this may be due due to a clash between Show Buddy Active and Apple’s USB driver.
For example, a range called” light purple” would be recognised as “purp”, and the visualiser would render it as purple.
How do I send video from Show Buddy Active to my projector?
Connect and configure your projector as described above. Then, click the “monitor” icon (upper-right on the visualiser) to open the video window. Finally, drag the video window to your projector and click on it to make it full-screen.
How do I convert my video footage to use in Show Buddy?
We recommend the open source application HandBrake as the tool of choice for converting video footage.
Show Buddy Active can play back webm video files, encoded in the VP8 or VP9 format. However, we highly recommend encoding videos using VP8, as it is more efficient than VP9 and less demanding on your CPU. Also, encode at the lowest resolution you need. There’s no point in encoding a video at 4K resolution, to then play it back on a 1024×768 projector.
Is it best to program shows using short video clips, or full videos lasting the full song length?
If you wish, you can create presets that only play long videos and do nothing with your lights. Then you can trigger videos and lighting independently. However, things get much more interesting if you add short video clips to your lighting presets.
We recommend you think of your projector as an extra intelligent fixture in your lighting rig, and think of each SBA preset as being a cohesive look, containing both DMX lighting and video content. This way, when you crossfade between SBA presets the video clips will automatically crossfade to match your lighting. When you move or copy presets on your timeline, your video content will instantly update to match. You will also be able to reuse fuill looks (with lifghting and video content) across songs much more easily.
Some of the advanced SBA video techniques also work best with short clips. You can layer multiple clips and images into a single preset. For example, you could have an “Intro” preset which sets up your pre-show lighting, and plays a short video loop with your band logo layered on top. You can even animate video layers to match the tempo of the current audio.
Another fun technique to try out is pixelmapping – that is, sending video clips to both the projector and your DMX lights. This can make your entire DMX rig react in realtime to the video clip. Here are a couple of real examples:
How do I send video from Show Buddy Active to my projector?
Can we run Show Buddy Active with two external monitors – one to let ourt singer see the SBA window, and another to run the projector for the audience?
Yes, assuming your laptop supports two external screens. Just configure your monitor screen as a mirror, and your projector as an extended desktop. Then drag the SBA video window over to the projector. Both Windows and macOS support this monitor setup:
I’m using automation to control SBA faders. Why is the latency so high?
The Show Buddy Active window refreshes at a slow rate to minimise CPU load. But DMX data is always transmitted at full speed, with high priority and low latency.
See this short demo on YouTube. Notice the labels under the SBA channel faders update slowly. But the ‘ArtNetMon’ app (displaying the DMX data stream from SBA) shows the data running reliably with low latency.
How to move & copy groups of cues in Show Buddy Setlist
Question: If I update a mix to add or remove a few bars, is it possible to select a whole region of lighting cues and move them around as a group?
Yes – just click & drag anywhere in the waveform (not on the cue labels or handles) to select a group of cues, then drag any highlighted cue to move that whole group.
You can also quickly copy groups of cues. Say you have a nice sequence of cues for the first chorus in a song. Select the group as above, then Ctrl-drag on any highlighted cue. This creates a copy of your chorus lighting. Drag the copy to chorus two in the song, and you’re done.
You can also copy/paste groups of cues between different songs. Just highlight the cues in your source song and click Ctrl-C. Then load the target song, position the playhead where you want to paste, and click Ctrl-V.
An overview video showing all the Show Buddy Setlist features in action. Lightshow visualisation provided by Capture Sweden (not included with Show Buddy).
Note: this video shows DMXIS (now unsupported) being used for the lighting control. Show Buddy Setlist is also compatible with our latest Show Buddy Active lighting controller.