This feature is available in Show Buddy Active 2.4.0 or better.
Flash buttons can be added to the Perform tab button panel. When you press a flash button, the corresponding preset is activated. When you release the flash button, the preset stops.
Flash buttons are great for hands-on control of special effects likle crowd blinders, and for triggering specialised equipment like haze machines. Let’s look at a real example.
Import the downloaded .sab file from [File > Restore from backup…]
Then go to [Show > Manage Shows…] and load ‘Flash Button Demo’.
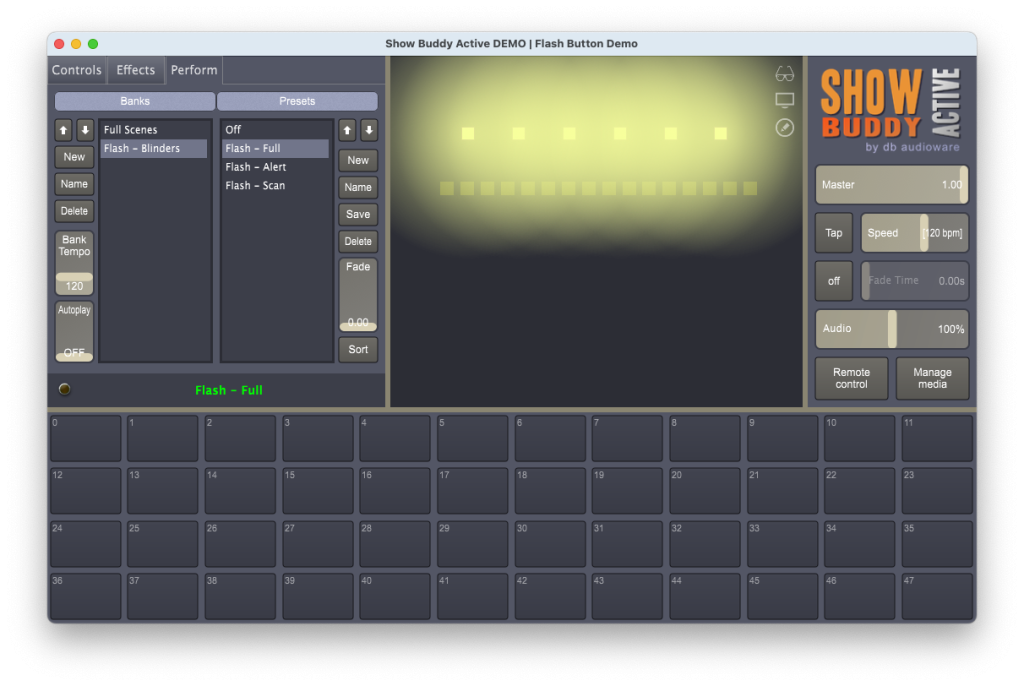
This show has six blinders, controlled by the bank “Flash – Blinders“:
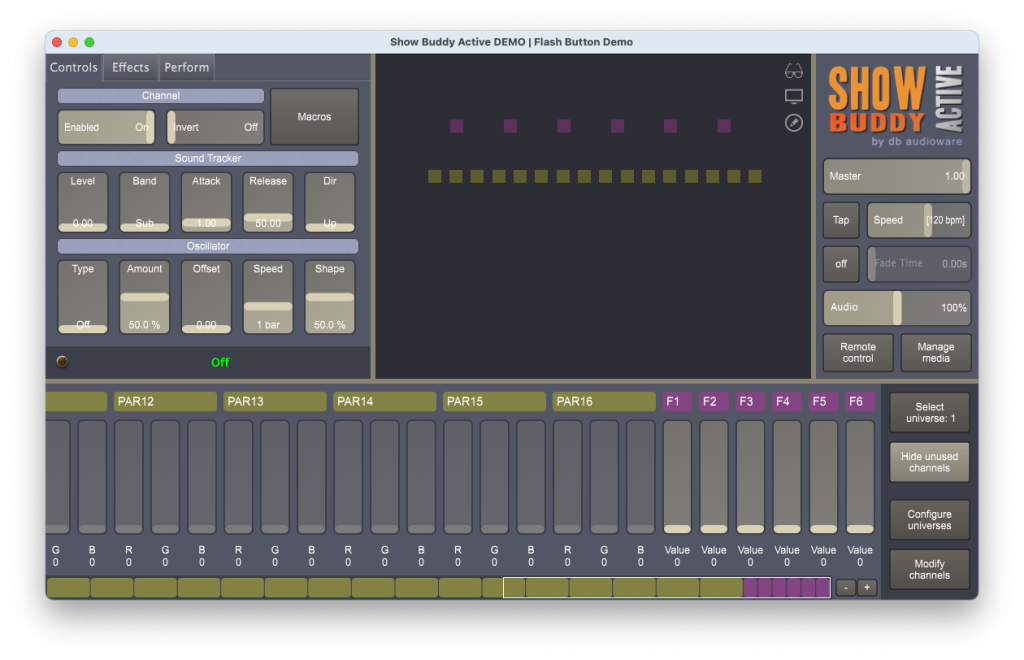
Notice the bank contains an ‘Off‘ preset. This switches the blinders off when a flash button is released. Also notice that all presets in the bank use channel masking to ensure that only the blinder channels are controlled:
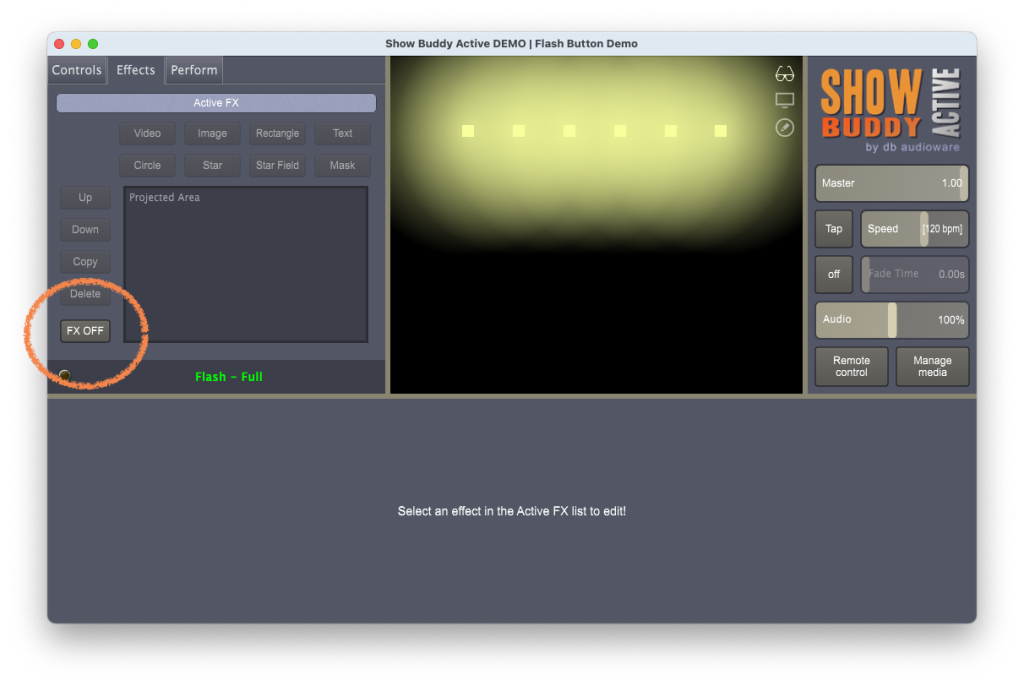
Also, notice that we have disabled the Effects for every flash preset in the bank:
By using channel masking and disabling the Effects, we can now trigger flash effects without affecting any other fixture.
The ‘Full Scenes‘ bank contains normal fully-programmed presets. These regular presets don’t need channel masking, and can make use of the Effects tab.
Now, we can simply drag presets from the “Flash – Blinders” bank onto the button panel, and we have our flash buttons! The following short video shows our flash buttons in action!
Triggering flash buttons from MIDI
You can trigger flash buttons from mouse/keyboard, but triggering then from a physical MIDI controller is far more tactile – and fun!
Just configure “Listen on MIDI channel‘ in the Preferences window. Then transmit MIDI notes on that channel to trigger the flash buttons. (The MIDI notes needed are shown in the top-left of the buttons)
Programming flash buttons from a DAW
Finally – with flash banks, you can program perfectly-timed flash patterns from your DAW. Just position and size your MIDI notes where you want the flash! The following short video shows this technique in Logic Pro…
Show Buddy Active macros are written in Python language. To be specific, Show Buddy Active runs Python version 3.10.
All the usual Python system libraries, functions and programming constructs are available within a Python macro. You can execute macros from the Macros button on the Show Buddy Active screen.
A macro can modify any on-screen Show Buddy Active attribute, for example fader levels and oscillator settings. Some higher level functions (e.g. iterating though and saving banks & presets) is also available.
However, it is important to realise thatmacros do not run in realtime, and can not directly manipulate the DMX data being generated.
Think instead of macros as programming shortcuts that let you quickly set up a number of DMX channel settings, or perform some high level maintenance task (like copying a setting between different presets).
Macros are stored in the “Macros” folder of the Show Buddy Active installation folder.
Structure of a macro
A macro is typically a simple block of Python code with no user interaction. Macros cannot prompt for custom information. A macro can only query the Show Buddy Active engine for basic information (typically the currently selected channels) and display a single information dialog once the macro code has completed execution (or if the macro fails for some reason).
Get the selected channels
ns = GetNumSelCh
if ns==0:
   Message("Select some channels first!")
Set all selected channel faders to halfway point
for i in range(ns):
   SetChVal(GetSelCh(i), 128)
Writing macros
Show Buddy Active scans the macros folder every time you click on the “Macros” button. So, there is no need to restart the software every time you modify a macro or create a new one. Simply save your macro file within your editor, then select it from the “Macros” button.
Each macro lives in a single .py file – simply use your favourite text editor to edit the macro files.
You can create any folder structure you like within the main ‘Macros’ folder, and they will appear as submenus in the Show Buddy Active interface.
Do not modify the ‘Macros/System’ or ‘Macros/Python’ folders
Debugging macros
In Show Buddy Active, select the “Advanced > Macro output console” menu option to see the standard Python output terminal. In here, you will see any Python interpreter errors, to assist you in debugging your scripts.
You can also generate your own debug output by using the standard Python ‘print’ keyword in your macros. For example, this simple macro will display the current value of every selected fader in the macro output console window:
n = GetNumSelCh()
for i in range(n):
   chNum = GetSelCh(i)
   print 'Channel %d value = %d' % (chNum, GetChVal(chNum))
Function reference
A full reference list for the various functions available within a macro now follows. Most functions are grouped as get/set pairs, to query or modify a particular attribute. As with all programming languages, the best way to learn is by example. So in addition to this guide, take a look through the standard factory macros to see what is possible.
A note on channel numbers
Many of the following functions require a channel in the range 0-1023 (for 2 universe licenses) or 0-8191 (for 16 unlverse licenses).
The channel is (universe – 1) * 512 + fader – 1. For example, fader 107 in universe 2 = channel 618
General functions
Message(string msg) Displays the given message as a dialog window in the Show Buddy Active GUI. Use this to optionally report a problem (e.g. “select an RGB channel first”).
Effects control
EnableEffects DisableEffects Switches the “Effects” tab on or off.
Channel selection
integer GetNumSelCh Returns the number of currently selected channel faders.
integer GetSelCh(integer idx) Returns the DMX channel offset of a selected channel.
idx = 0 to GetNumSelCh return value minus 1
array GetAllSelCh(False) Convenience function to get all selected channels. Example use:
# Set all selected channels to 150
for ch in GetAllSelCh(False):
   SetChVal(ch, 150)
SelectCh(integer ch, integer sel) Selects or deselects the fader for the given DMX channel.
ch = 0 to 1023 (or 8191 for Show Buddy Active Max)
sel = 0 (deselect the fader) or 1 (select the fader).
Channel names
string GetChName(integer ch) Returns the name of the given DMX channel. Useful for macros that only work on specific channel types (e.g. “Pan” or “Tilt” channels)
ch = 0 to 1023 (or 8191 for Show Buddy Active Max)
General channel settings
integer GetChVal(integer ch) SetChVal(integer ch, integer val) Sets or gets the fader level for the given DMX channel.
ch = 0 to 1023 (or 8191 for Show Buddy Active Max)
val = 0 to 255
SetChInvert(integer ch, integer val) integer GetChInvert(integer ch) Modifies or retrieves the ‘Invert’ knob value level for a given DMX channel.
ch = 0 to 1023 (or 8191 for Show Buddy Active Max)
val = 0 (invert off) or 1 (invert on)
Channel masking
SetChEnabled(integer ch, integer val) integer GetChEnabled(integer ch) Enables or disables a given DMX channel. This is used to implement the critical “channel masking” feature of Show Buddy Active.
ch = 0 to 1023 (or 8191 for Show Buddy Active Max)
val = 0 (channel disabled) or 1 (channel enabled)
Oscillator settings
SetOscAmount(integer ch, float val) float GetOscAmount(integer ch) Sets or gets the amount of oscillation for the given DMX channel.
ch = 0 to 1023 (or 8191 for Show Buddy Active Max)
val = 0.0 (no oscillation) to 1.0 (full oscillation). Higher values will “overdrive” the oscillator, making the fader “clip” at 0 and 255. This can be a useful effect.
SetOscChase(integer ch, float val) float GetOscChase(integer ch) Sets or gets the oscillator phase for the given channel. By setting a range of channels to a different phase value, you can create complex chases.
ch = 0 to 1023 (or 8191 for Show Buddy Active Max)
val = 0.0 to 1.0. A value of 0.5 makes the oscillator run precisely 180 degrees out of phase.
SetOscSpeed(integer ch, integer val) integer GetOscSpeed(integer ch) Sets or gets the oscillator speed for the given channel. This is one of a set of fixed tempo-based values.
ch = 0 to 1023 (or 8191 for Show Buddy Active Max)
val 0 = 1/16 bar, 1 = 1/8 bar, 2 = 3/16 bar, 3 = 1/4 bar, 4 = 3/8 bar, 5 = 1/2 bar, 6 = 3/4 bar, 7 = 1 bar, 8 = 2 bars, 9 = 3 bars, 10 = 4 bars, 11 = 6 bars, 12 = 8 bars, 13 = 12 bars, 14 = 16 bars, 15 = 24 bars, 16 = 32 bars, 17 = 48 bars, 18 = 64 bars, 19 = 96 bars, 20 = 128 bars
SetOscShape(integer ch, float val) float GetOscShape(integer ch) Sets or gets the oscillator shape for the given channel. The effect this has on the waveform depends on the oscillator type selected (see the user manual for more information)
ch = 0 to 1023 (or 8191 for Show Buddy Active Max)
val = 0.0 to 1.0
SetOscType(integer ch, integer val) integer GetOscType(integer ch) Sets or gets the oscillator waveform for the given channel.
ch = 0 to 1023 (or 8191 for Show Buddy Active Max)
SetStLevel(integer ch, float val) float GetStLevel(integer ch) Sets or gets the sound tracker level.
ch = 0 to 1023 (or 8191 for Show Buddy Active Max)
val = 0.0 to 5.0
SetStBand(integer ch, integer val) integer GetStBand(integer ch) Sets or gets the sound tracker EQ band for the given channel.
ch = 0 to 1023 (or 8191 for Show Buddy Active Max)
val 0 = sub, 1 = low, 2 = mid, 3 = high
SetStAttack(integer ch, float timeMs) float GetStAttack(integer ch) Sets or gets the sound tracker attack time (in ms).
ch = 0 to 1023 (or 8191 for Show Buddy Active Max)
timeMs = 0.0 to 10.0
SetStRelease(integer ch, float val) float GetStRelease(integer ch) Sets or gets the sound tracker release time (in ms).
ch = 0 to 1023 (or 8191 for Show Buddy Active Max)
timeMs = 0.0 to 250.0
SetStDir(integer ch, integer val) integer GetStDir(integer ch) Sets or gets the sound tracker direction for the given channel.
ch = 0 to 1023 (or 8191 for Show Buddy Active Max)
val 0 = up, 1 = down
Bank & preset functions
The following functions are useful for macros which perform global edits (e.g. making a modification across all presets in a bank, or every preset in a show). See the “Global Edits” factory macros for example usage.
integer GetNumBanks Returns the number of banks in the currently loaded show.
string GetBankName(integer idx) Returns the name of the given bank
idx = 0 to number of banks in show – 1
LoadBank(integer idx) Loads the given bank (by index number)
idx = 0 to number of banks in show – 1
LoadBank(string s) Loads the given bank (by bank name)
s = bank name
integer GetNumPresets Returns the number of banks in the currently loaded bank.
string GetPresetName(integer idx) Returns the name of the given preset
idx = 0 to number of presets in the current bank – 1
LoadPreset(integer idx) Loads the given preset (by index number)
idx = 0 to number of presets in bank – 1
LoadPreset(string s) Loads the given preset (by preset name)
s = preset name
SaveCurrentPreset Overwrites the currently loaded preset with the current settings
Fixture profile functions
A couple of functions for basic fixture profile handling. See the “Fixture Setup” category of factory macros for example usage.
RepeatLastFixture Takes the most recently loaded fixture profile, and loads another one at the next available free channel
RemoveFixture(integer ch) Unloads any current fixture profile from the specified channel.
ch = 0 to 1023 (or 8191 for Show Buddy Active Max)
I’m using automation to control SBA faders. Why is the latency so high?
The Show Buddy Active window refreshes at a slow rate to minimise CPU load. But DMX data is always transmitted at full speed, with high priority and low latency.
See this short demo on YouTube. Notice the labels under the SBA channel faders update slowly. But the ‘ArtNetMon’ app (displaying the DMX data stream from SBA) shows the data running reliably with low latency.
Can Show Buddy Active run with two external monitors?
Yes, assuming your laptop supports two external screens. Just configure your monitor screen as a mirror, and your projector as an extended desktop. Then drag the SBA video window over to the projector. Both Windows and macOS support this monitor setup:
If you wish, you can create presets that only play long videos and do nothing with your lights. Then you can trigger videos and lighting independently as follows:
Make sure your video preset doesn’t control your lights by disabling the “Lights” option in the “Effects” tab
In all of your lighting presets, disable the “Effects” tab by changing “FX ON” to “FX OFF“. This will prevent your lighting presets from stopping the video
This of course means your lighting presets need to be designed entirely from the “Controls” tab
However, things get much more interesting if you add short video clips to your lighting presets like this:
We recommend you think of your projector as an extra intelligent fixture in your lighting rig, and think of each SBA preset as being a cohesive look, containing both DMX lighting and video content. This way, when you crossfade between SBA presets the video clips will automatically crossfade to match your lighting. When you move or copy presets on your timeline, your video content will instantly update to match. You will also be able to reuse full looks (with lighting and video content) across songs much more easily.
Some of the advanced SBA video techniques also work best with short clips. You can layer multiple clips and images into a single preset. For example, you could have an “Intro” preset which sets up your pre-show lighting, and plays a short video loop with your band logo layered on top. You can even animate video layers to match the tempo of the current audio.
Another fun technique to try out is pixelmapping – that is, sending video clips to both the projector and your DMX lights. This can make your entire DMX rig react in realtime to the video clip. Here are a couple of real examples:
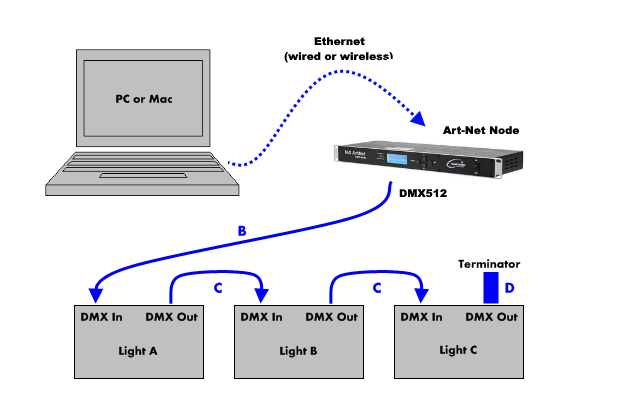
Show Buddy Active can control one universe of DMX lighting via any Enttec PRO or Open DMX compatible hardware interface.
To control multiple universes, an Art-Net node is required.
We recommend using Art-Net if you intend to run professional shows. As a network based protocol, Art-Net takes a little more effort to configure compared to a USB interface, but offers better reliability. Simple Art-Net interfaces like the Chauvet DMX-AN2 give multiple universes of DMX output at a reasonable price point.
Enttec USB PRO compatible boxes are reliable and convenient. However, you are limited to only one universe of DMX output.
Open DMX interfaces (the original Enttec box, or a compatible 3rd party interface) are mainly designed for hobby applications. They are an affordable way to experiment with lighting, but don’t have the reliability & feature set of the more expensive PRO boxes.
How do I send video to a projector?
With a Show Buddy Active Projection license, you can play video as well as control DMX lighting.
This is easy to set up – simply connect your projector to your computer as recommended by the manufacturer. As most projectors tend to use HDMI or VGA connectors, you will often need to use a suitable adaptor cable (e.g. to connect to the USB-C port on your laptop).
Once connected, setup macOS or Windows to use your projector as an extended desktop. Then, click on the ‘monitor’ icon (top-right in the Show Buddy Active visualiser) to open the video window, and drag that window onto the projector section of the desktop. Finally, click anywhere in the window to make it full-screen.
I use a footswitch connected to the DMXIS box. Where did the footswitch settings go in the software?
Hardware support in Show Buddy Active has changed significantly, since the DMXIS interface box is no longer available to purchase. The footswitch socket of the old DMXIS hardware is no longer supported.
Show Buddy Active now supports a wider range of generic DMX interfaces (see above), and footswitch control is now via the new “Remote Control” button. You can use any generic PC USB foot pedal or a MIDI footswitch to remotely control Show Buddy Active.
Art-Net is more complex to configure than a simple USB interface, but is a far more flexible way to get DMX data from Show Buddy Active to your lights.
With Art-Net, Show Buddy Active can transmit DMX data directly from the computer via a standard Ethernet network. In practice, this means you can control your lighting wirelessly. You can also control a larger number of universes and have more flexibility on how you design your lighting rig.
To get Art-Net data into your lights, you use hardware devices known as an Art-Net nodes. These can turn the ArtNet data into a DMX signal (which you then plug into your lights). Art-Net nodes are also available which wirelessly convert Art-Net data for strips of pixel tape. With Art-Net, you have much more flexibility in how you design and connect your lighting system.
The following lighting rig uses an Art-Net node instead of a USB-to-DMX hardware box.
Using Art-Net in Show Buddy Active
To add Art-Net connections in Show Buddy Active, follow these steps:
Select “Configure universes” on the bottom right of the “Controls” tab
Click “New Art-Net output…“
Select “Unicast” from the drop-down menu, and enter the IP address of your Art-Net node
Enable the universe numbers you wish to transmit to Art-Net
Recommended Art-Net nodes
There are many different Art-Net nodes available that would be suitable. Here are some that we recommend:
How do I send video from Show Buddy Active to my projector?
Connect and configure your projector as described in this article. Then, click the “monitor” icon (upper-right on the visualiser) to open the video window. Finally, drag the video window to your projector and click on it to make it full-screen.
How do I convert my video footage to use in Show Buddy?
Show Buddy Active can play back webm video files, encoded in VP8 or VP9 format. However, we highly recommend encoding videos using VP8, as it is more efficient than VP9 and less demanding on your CPU.
Also, encode videos at the lowest resolution you need to minimise CPU load. There’s no point in encoding a video at 4K, to then play it back on a 1024×768 projector.
We recommend the open source application HandBrake as the tool of choice for converting video footage.
Here is a standard HandBrake preset for converting videos for use in Show Buddy Active. To import this preset into HandBrake:
Extract the ZIP file
Open HandBrake
Select the “Preset” menu
Open “Options“
Select “Import Preset(s) from file” and choose the extracted “.json” file
How to share or backup your Show Buddy Active data
You can copy your Show Buddy Active data to other computers (for sharing or backup purposes) using the built-in Backup and Restore features.
A Show Buddy Active backup is a .sab file. It contains all data required to fully restore complete shows, including banks & presets, fixture definitions, fixture patching, and all images or video files used by your presets.
Backing up shows
Open the Show Buddy Active standalone app.
Select File > Backup show data… from the main menu.
Enter a text description for the backup file.
Click Backup ALL shows… OR highlight the shows you need and click Backup selected…
Click Yes to proceed.
Choose a name and location for your .sab backup file and click Save.
Copy the resulting .sab file to your backup drive or the other computer.
Restoring from a backup
Open the Show Buddy Active standalone app.
Select File > Restore from backup… from the main menu.
Click Yes to proceed.
Locate your .sab file and click Open.
Confirm that the description is correct.
Click Restore all shows… OR highlight the shows you need and click Restore selected shows…
Click Yes to proceed.
You can now load and run the restored shows from Show > Manage shows… on the main menu.