Why can I not import fixtures into Show Buddy Active?
Problem – you downloaded a fixture from the online library, but when you try to import it into Show Buddy Active (from File > Manage fixtures) you get an error, or the file cannot be selected.
The Reason
Fixtures are downloaded as .zip files. and Show Buddy Active can only import these original .zip files.
If your computer automatically opens the .zip file, you’ll end up with a folder called “DmxLibrary” that contains one or more “.dmx” files. These cannot be imported directly.
Here’s how to prevent your browser from auto-extracting zip files.
macOS Users
On a Mac, Safari and the built-in Archive Utility may automatically unzip downloads.
Stop Safari from Unzipping Files
Open Safari.
From the menu bar, choose Safari > Settings (or Preferences).
In the General tab, uncheck: “Open ‘safe’ files after downloading.”
Now downloaded zip files will stay zipped.
Stop Archive Utility from Removing Zip Files
Open Finder → Applications → Utilities → Archive Utility.
In the top menu, select Archive Utility > Preferences.
Under “After expanding”, choose “Leave archive file.”
Windows Users
On Windows, web browsers (Chrome, Edge, Firefox, etc.) normally do not unzip files automatically.
If your zip files are still being unpacked, it’s usually caused by another program on your computer, such as:
A download manager (e.g., Internet Download Manager, Free Download Manager)
An archiving tool (e.g., WinRAR, 7-Zip, PeaZip)
Antivirus or security software
What to Do
Open the program’s settings and look for options like:
“Auto extract archives after download”
“Unpack files automatically”
Turn those options off.
If you’re not sure which program is doing it, try temporarily disabling or uninstalling extra download tools, then test again.
Manual Workaround
If you prefer, you can manually copy the fixtures files as follows.
Locate the .dmx files (in the DmxLibrary folder of the downloaded zip file)
Copy the .dmx files into your Show Buddy Active fixture library:
Windows : C:/Users/Public/Public Documents//db-audioware/Show Buddy Active/DmxLibrary
Mac : /Library/Application Support/db audioware/Show Buddy Active/DmxLibrary
Show Buddy Active not transmitting Art-Net (macOS Sequoia or newer)
Problem: You have correctly configured Art-Net settings in Show Buddy Active, but no data is being received by your Art-Net hardware.
You have successfully used ArtNetMon to confirm that the software is transmitting Art-Net data locally.
Solution: macOS Sequoia may be blocking your Art-Net data. Go to System Settings > Privacy & Security > Local Network, and make sure ‘Show Buddy Active‘ is enabled.
By default, the performance buttons on the “Perform” tab can be triggered by notes sent on MIDI channel 14.
The MIDI note numbers required are displayed on the buttons. For example, here MIDI note 10 on channel 14 would trigger the “Gears” preset, and note 26 would trigger the “Graceful” preset.
If required, you can change the MIDI channel from the Preferences window:
Problem: you want a long video to run continuously for the entire duration of a song. But when you change presets, the video playback stops.
Explanation: When you load a preset, the Effects tab stops all FX layers currently playing – including your video that was triggered by the earlier preset.
The solution is to disable the Effects engine in all subsequent presets. Edit every other preset in the song, and disable the Effects engine via the “FX OFF” button:
Important note:
This technique has an important limitation. Since the FX engine is effectively tied up performing video playback for the duration of the song, you can no longer use the “Effects” tab to program your lights in the remaining presets. For those presets, you will need program your lights from the “Controls” tab (using faders and oscillators).
Show Buddy Active : presets not loading and/or Effects tab is not working
Solution : Open File > Preferences > Audio/MIDI Settings and make sure a valid Input audio device is selected:
Explanation : Show Buddy Active uses the audio input as an accurate timing source, to manage crossfades and oscillators, and to process incoming MIDI data. If no input is active, then you will experience various issues with switching between presets and running effects within presets.
Show Buddy Active can run as a VST or AudioUnit (AU) plugin directly within any compatible DAW. This lets you visually program synchronised light shows alongside your audio tracks.
This article shows the quickest way to program lights in Logic Pro using the Show Buddy Active AU plugin.
First, open your Logic song and choose [Track > New tracks…] from the main menu.
This takes you to the “Create New Track” window.
Highlight Software Instrument in the MIDI box
In the Instrument popup menu, select AU MIDI-controlled Effects > db audioware > Show Buddy Active > Mono
Set Multi-timbral = 2 parts
Click the Create button.
This will add two new tracks to your arrangement. We will use the first track to program our SBA bank changes, and the second track to program our SBA preset changes.
Rename the tracks to SBA Banks and SBA Presets.
Under the Track inspector panel, set MIDI Out channel for the tracks to 15 and 16. (MIDI channel 15 switches SBA banks, and track 16 switches SBA presets)
At this stage, the Show Buddy Active AU has been added to your project, and you are ready to start programming some lighting changes!
Simply add MIDI regions and notes as required, wherever you need an SBA bank or preset change. For example, here we have a MIDI region on the Bank track that triggers the first bank at bar 1 (using Note C-2), and the second bank at bar 2 (using note C#2).
You may find that when you load a fixture into Show Buddy Active, it displays too many icons, or not enough icons on the visualiser, or doesn’t display colours correctly. This indicates that the fixture needs some tweaking to work with SBA.
SBA examines each fixture to find the “heads”, and each head is displayed on the visualiser as a separate icon. For example, an RGB parcan has one head, an 8-channel dimmer pack has 8 heads, an LED strip with 6 RGBAW sections has 6 heads.
SBA creates heads according to these rules:
If there is at least one Dimmer channel, and no RGBAW channels, create a head for each Dimmer channel;
If there is at least one RGB/RGBA/RGBW/RGBAW block, create a head for each block;
Otherwise, create a single head.
In addition:
RGBAW and Dimmer channels must be defined as type “D” in the fixture file.
RGBAW must be named “red”, “Red”, “R”, “green”, “Green”, “G” etc in the fixture file.
These simple rules will cover most popular fixtures. However, the more fiddly fixtures present a problem – not just for SBA, but for every DMX visualiser out there. I’m thinking of those ‘adventurous’ fixtures that try to combine a laser, two moonflowers, a toaster oven and an electric toothbrush on one convenient t-bar.
For those more complex fixtures, it’s usually best to split it into several fixture files , one for each logical section of fixtures.
The “Modify Channels” window is available in Show Buddy Active 2.3.0 or later. It lets you make a variety of tweaks to the transmitted DMX data – crucially, without editing any of your presets. Some useful applications include:
Applying dimmer curves to the colour channels of LED fixtures.
Forcing channels to transmit fixed values (e.g. to disable unwanted effects channels).
Restricting the range of channels (e.g. to limit the maximum brightness of LED floods).
Modifying the pan/tilt ranges of movers at each venue – without editing presets!
Controls overview
This list shows every channel patched in your lighting rig. You can select channels for editing here, or by selecting channels as normal in the “Controls” tab of the main window.
Create multiple profiles and switch between them as required. For example, you could have profiles with different rig brightness levels, or profiles with moving head positions tweaked for different venues.
“Override” locks selected channels at the value set by the slider.
The display shows the current tweaks applied.
“Symmetric” and “Curve shape” modify the dimmer curve applied.
“Min and Max DMX val” limit the range of possible channels values.
“Scale” and “Shift” will offset or multiply the DMX values transmitted.
“Reset” will revert all channel settings to the default values.
Dimmer curves
Here, we apply a logarithmic dimming curve to the RGB channels of the “Wash3” fixture. This can improve the intensity and colour response of fixtures with simple LED drivers.
Overriding channel values
Here, we override some redundant channels on “Wash3” to a fixed value of zero. Often, fixtures have a range of custom channels for controlling built-in effects or other special features. If we are not interested in using these special features, we can override them and the corresponding DMX channels will remain locked at the specified value.
Additionally, when “Hide unused channels” in activated on the main window, any overriden channels are also hidden from the fader rack, leaving you to focus on the channels that matter.
Limiting channel ranges
Here, we limit the maximum dimmer level of all RGBA channels in fixtures CD1-CD4. This effectively halves the brightness of those 4 fixtures.
This is useful for fine tuning the brightness of sections of your rig at the venue, without needing to edit any presets. For example, if a spotlight is blinding the performer in one particular venue, simply reduce “max DMX val” for the spotlight dimmer channel.
Modifying mover position & range at a venue
Here, we scale the Pan & Tilt channels of “Wash4” down to 80%, effectively reducing the stage area covered by that mover – again, without editing any presets.
Use the Min/Max/Scale/Shift controls to manipulate the range of moving heads as required. For example, if you need to prevent movers scanning the crowd at the venue, tweak the min/max values for the Tilt channels until the movers stay on the stage.
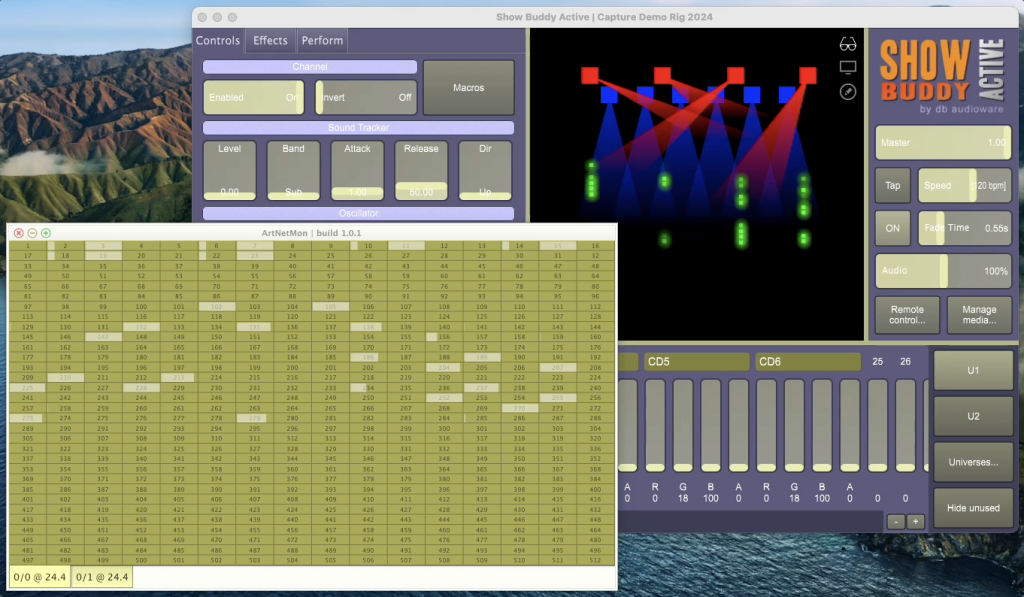
The free ArtNetMon utility displays DMX data transmitted by Show Buddy Active in realtime. This is really handy for checking that the values sent to your fixtures are correct – especially of you have a preset which is behaving strangely.
This also displays the data being sent to a USB interface box. It does not require you to use Art-Net to control your rig.
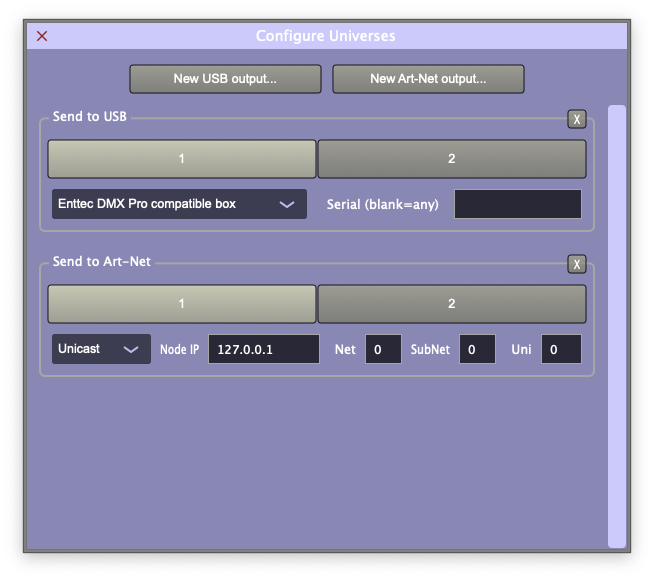
Just download and install the ArtNetMon utility onto the same computer you run Show Buddy Active from. Then click the “Universes…” button and add a new Art-Net output (Unicast to 127.0.0.1) as follows:
Now, run ArtNetMon, and it will display the DMX data being sent to your USB and/or Art-Net interfaces.